
Just over 4 years ago, on 18th March 2018, I committed the first CP/M-IDE files into the RC2014 repository. Now that some time has passed and it has developed into a stable solution for CP/M I think it is time to fill in some details about why it was written, how it differs from other CP/M implementations, and how to reproduce images to match those in the CP/M-IDE repository.
Concept
There are several implementations of CP/M available for the RC2014. Initially, the CP/M on a Breadboard project implemented by Grant Searle became the default implementation for the Z80 RC2014. Slightly later Wayne Warthen added support for the RC2014 to the Z80/Z180 RomWBW System. RomWBW is a very extensive and advanced set of system software, supporting many different RetroBrew machines, and in general it requires 512kB ROM and 512kB RAM to reach its full potential.
Each of these implementations has its own focus. The 9 Chip CP/M is based on simplicity, and being able to be built on a breadboard with the minimum of complexity, but it has not been maintained (e.g. correcting the bugs in the SIO and ACIA serial implementations requiring arbitrary interstitial delays to be inserted, otherwise data loss occurs) and it has a substantially smaller TPA. Alternatively, RomWBW supports a variety of hardware including Z180 CPUs, and provides an underlying generalised architecture support which provides paged memory and many facilities but this imposes a processing overhead on I/O, and requires substantially more RAM (512kB) than a typical CP/M system.
Faced with both these options, and being very interested to build my own solution, and to use my growing experiences supporting the z88dk community, I decided to build CP/M-IDE to fulfil a specific niche.
The CP/M-IDE is designed to provide support for CP/M on Z80 while using a normal FATFS formatted PATA or IDE drive. And further, to do so with the minimum of cards, complexity, and expense. Most recently, it has also become the CP/M which supports the 8085 CPU Module. Also recently, support for the standard RC2014 Pro with CF Module v2.1 and for the RC2014 Mini II with CP/M Expansion Kit has been added.
Initially I chose the IDE Hard Drive Module specifically because I could use it to attach any old hard drive, aka “spinning rust”, to my RC2014, and this led to support for everything from these old 3 1/2″ hard drives, through to modern SSD or DOM solid state drives. It also supports both old and modern high capacity Compact Flash Cards in their native 16-bit mode, so readily available modern 1 and 2 GigaByte Compact Flash cards are OK. It is also possible to use SD Card to CF Card adapters with the IDE Hard Drive Module or the CF Module v2.1, allowing direct support of modern pluggable SD or Micro SD storage.
I also wanted to build a very inexpensive system so the original RC2014 Pro with CF Module v2.0, or RC2014 Mini with CP/M Expansion Kit, is sufficient for modern storage solutions. And as an option the RC2014 IDE Hard Drive Module is the only additional Module required to operate CP/M-IDE with older “spinning rust” hard drives. It is NOT necessary to buy an expensive 512kB/512kB Memory Module as the standard 64kB RAM Memory Module works fine. If there’s no need or interest to attach proper IDE hard drives, or using a Compact Flash Module for storing CP/M drives is preferred, then there is no additional hardware required over the RC2014 Pro standard product.
CP/M is a very compact Operating System and, in the most common version 2.2, it supports only serial interfaces and disk interfaces. For the RC2014 there are two standard serial Modules, being the ACIA Module (used in the RC2014 Mini) and the more advanced and expensive SIO/2 Module (used in the RC2014 Pro).
As I’m quite interested in building real-time and event driven systems, in contrast to other CP/M implementations, CP/M-IDE therefore includes drivers supporting both transmit and receive interrupt based solutions, sourced from my z88dk RC2014 support package for the ACIA serial interface and the SIO/2 serial interface.
8085 CPU Module
More recently I have built a 8085 CPU Module for the RC2014 System. This is the first time that an 8085 CPU has been integrated into the RC2014 System, and it is able to work with the Z80 bus signalling required to drive the standard RC2014 Modules.
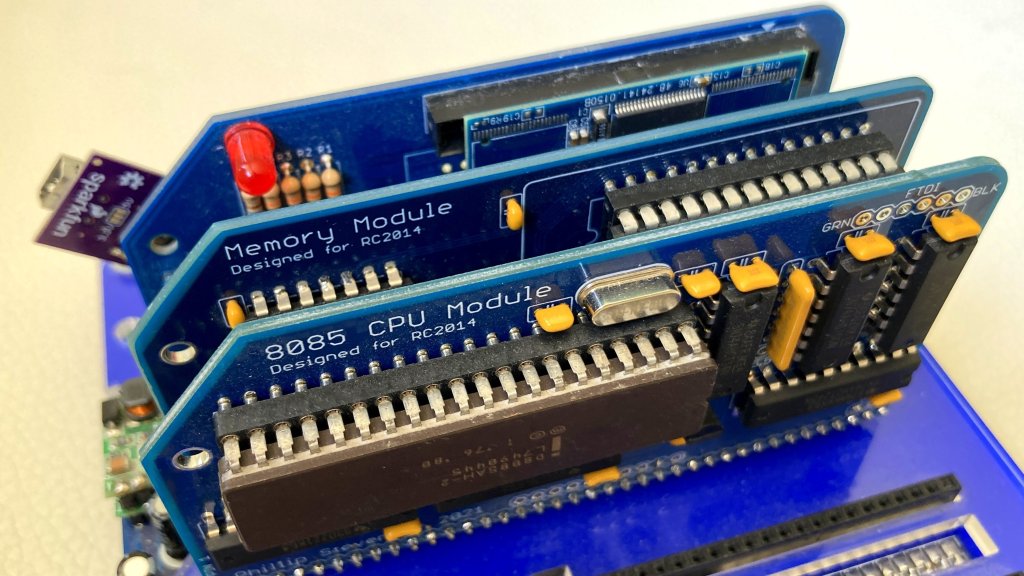
I am very pleased to have a wholly Intel RC2014 System equipped with the 8085 CPU Module, the 8231A APU Module, and the 8255 IDE Module. This is the original “Intel Inside”, before it became marketing jargon.
Hardware
The concept remains to use the minimum of additional hardware over the entry level RC2014 Pro model. In fact just the IDE Hard Drive Module is desirable. But, the standard CF Module v2.0 (and derivatives) can also be used as it supports modern (large capacity) CF Cards, and the RC2014 Classic II with CP/M Expansion Kit is also supported.
IDE Hard Drive Interface
The IDE Hard Drive Module is based on the 8255 PPI device. This device was designed to work with the 8085 CPU and 8086 CPU. It is perfectly suited to supporting a 16-bit parallel IDE interface as it provides latching of signals on 3 separate 8-bit ports.
Initially I was concerned that the selection of control signal pins for the IDE interface limited the possibility for use of the 82C55 device for generalised I/O. I still think that this is an issue but, since no one has implemented further generalised solutions, the point is moot.
The IDE Hard Drive Module supports PATA hard drives of all types (including SSD IDE and DOM storage) and Compact Flash Cards and SD Card Adapters in native 16-bit PATA mode with buffered I/O being provided by the 82C55 device.
The IDE interface (or also termed diskio) is optimised for performance and can achieve over 110kB/s throughput using the FatFS library in C. It does this by minimising error management and streamlining read and write routines. The assumption is that modern IDE drives have their own error management and if there are errors from the IDE interface, then there are bigger issues at stake.
The CF Module interface can achieve over 200kB/s throughput at FATFS level, and seems to provide best performance using SD Cards in SD Card to CF Card Adapters. The old default RC2014 CF Module v1.3 is often unstable with modern CF Cards or with SD to CF Card Adapters. However the recent RC2014 CF Module v2.1 has become quite reliable with all modern large and small CF Cards. If you experience problems, then seek out this recent implementation.
For both IDE interfaces, within CP/M performance is approximately half the FATFS performance because the CP/M deblocking algorithm implements a double buffer copy process where 512 Byte physical sectors found on IDE disks are converted into the 128 Byte logical disk blocks that CP/M expects.
Serial Interfaces
In the ACIA builds, the receive interface has a 255 byte software buffer, together with an optimised buffer management supporting the 68C50 ACIA receive double buffer. The choice of memory size for the receive buffer is based on optimisations available by having the buffer a full “page”. Also text can be “pasted” in fairly large chunks into the CP/M command line without losing bytes.
Hardware (RTS) flow control of the ACIA is provided. The ACIA transmit interface is also buffered, with direct cut-through when the 31 byte software buffer is empty, to ensure that the CPU is not held in wait state during serial transmission. The size of the transmit interface buffer is based on free memory within the CP/M BIOS. As BIOS memory is typically reserved to start on the 256 Byte page boundary, if an update needed to consume more RAM, I would reduce the size of the transmit buffer to avoid the need to consume an additional page of BIOS memory.
In the SIO/2 build, both ports are enabled. Both ports have a 127 byte software receive buffer supporting the SIO/2 receive quad hardware buffer, and a 15 byte software transmit buffer. The transmit function has direct cut-through when the software buffer is empty. Hardware (RTS) flow control of the SIO/2 is provided. Full IM2 interrupt vector steering is implemented.
As both ACIA and SIO/2 devices have a hardware buffer for received bytes, it is important for the receiving interrupt handler to drain these buffers completely before returning execution to the program. If this is not done there is a danger that received bytes could be overrun and lost.
For the CP/M-IDE 8085 build the Serial Output (SOD) FTDI interface found on the 8085 CPU Module is enabled as the CP/M LPT: interface. This is activated by using ^p as per normal practice.
Additional Hardware
Whilst there is no support for additional hardware within CP/M itself (as there are no BDOS calls standardised), it is possible to use additional hardware in CP/M applications. Typical hardware options include the APU Module, various Sound Modules, and digital I/O Module.
CP/M Implementation
There are many descriptions of Digital Research CP/M, so I won’t go into detail. It is important to know that CP/M v2.2 was in its day the most widely deployed Operating System for small computers based on the 8080, 8085, and Z80 CPUs. Later versions of CP/M supported the 8086, and 68000 CPUs, as well as providing many more system functions than the CP/M v2.2.
Whilst there have been later versions of CP/M produced, to my knowledge, there were no widely available user applications produced which could not be run on CP/M v2.2. This broad compatibility is why CP/M v2.2 is important.
CP/M v2.2 is essentially just 4 pieces of code. The BIOS (Basic Input Output System) is provided to abstract the hardware devices from the operating system. Essentially there is a limited set of BIOS commands that the BDOS can call on. These BIOS commands are implemented specifically for the characteristics each machine, and in the early days of computing it was essential that a user knew how to write their own BIOS.
The second piece of code is the Page 0 of memory, which is written by the BIOS cold boot command on initialisation. The role of this Page 0 is to provide important addresses (for both BIOS and BDOS) and to set important status registers like the I/O Byte. The Page 0 is also used to manage the 8080, 8085, and Z80 CPU interrupt vectors, and to store the command line entered by the user when an application is initialised.
The CP/M BDOS is the middle layer of the Operating System. Application programs rely on BDOS system calls to support their requirements. Here the drives (A:, B:, through to maximally P:) are opened and closed, and disk sectors are written. The BDOS does its work by calling BIOS commands on behalf of the application that is currently loaded.
Often the BDOS is combined with the CCP (Console Command Processor) into one assembly language file because both of these components are constant and they are independent of the hardware. These two components are essentially the distribution of Digital Research CP/M which was sold to the user.
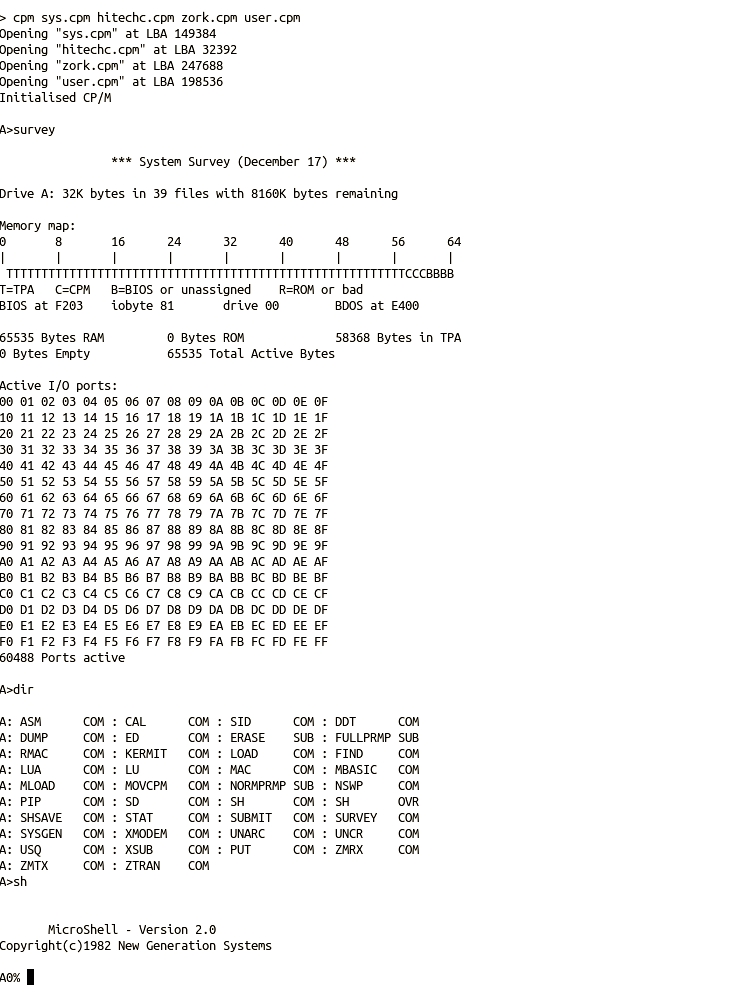
The CCP is the user interface for CP/M. It provides a very small number of integrated commands, like “directory list”, “erase”, “rename”, “type” or “exit”, but its main role is to load additional commands or applications called “Transient Programs” into RAM and execute them. Often, an application loaded into the Transient Program Area (TPA) RAM will overwrite the CCP in memory as it is normal for the CCP (and BDOS) to be reloaded once an application quits.
There are third-party alternatives available for both the CCP and BDOS, and as these are loaded each time the computer is restarted it is possible to replace the default versions by alternatives if desired. Specifically for CP/M-IDE, the DRI CCP can be replaced by Microshell SH (here), or both CCP and BDOS can be replaced by NZCOM also known as Z System without impacting the installed ROM system components.
CP/M Drives
CP/M was developed before there was a standard implemented for computer disk drives, and every system had its own peculiarities. In order to cope with this situation each BIOS had to be written to cover the possibilities, by completing a Disk Parameter Block. Each disk type needs its own DPB, which takes space in BIOS RAM, so it made sense for CP/M-IDE to be implemented with only one type of disk supported. Additionally each drive attached by the BIOS requires a substantial Allocation Vector RAM reservation. It needs to be said that providing for unused drives in CP/M substantially increases the BIOS size, and commensurately reduces the TPA RAM for user applications and in turn their working RAM. For comparison, CP/M-IDE has 3kB more TPA RAM available for user applications than the default RC2014 CP/M implementation.
A subtle but important advantage to using only one disk type is that every disk is orthogonal, and it can be located anywhere on the underlying physical disk (ie. starting at any LBA). Also, it does not matter into which CP/M drive A:, B:, C:, or D: a disk is mounted when booting. The CP/M “system disk” looks exactly like any other disk, and every CP/M disk file can be located anywhere on the FATFS parent drive.
Further, the CP/M-IDE CCP/BDOS/BIOS operating system binaries are loaded from ROM. This is not typical, as most CP/M BIOS implementations will load the CCP/BDOS/BIOS from the first sectors (or tracks) of the first attached physical drive, and will require the system disk to be located in specific sectors of the physical drive, and they also rely on a specific allocation of LBA addressed sectors (or slices) for all additional drives.
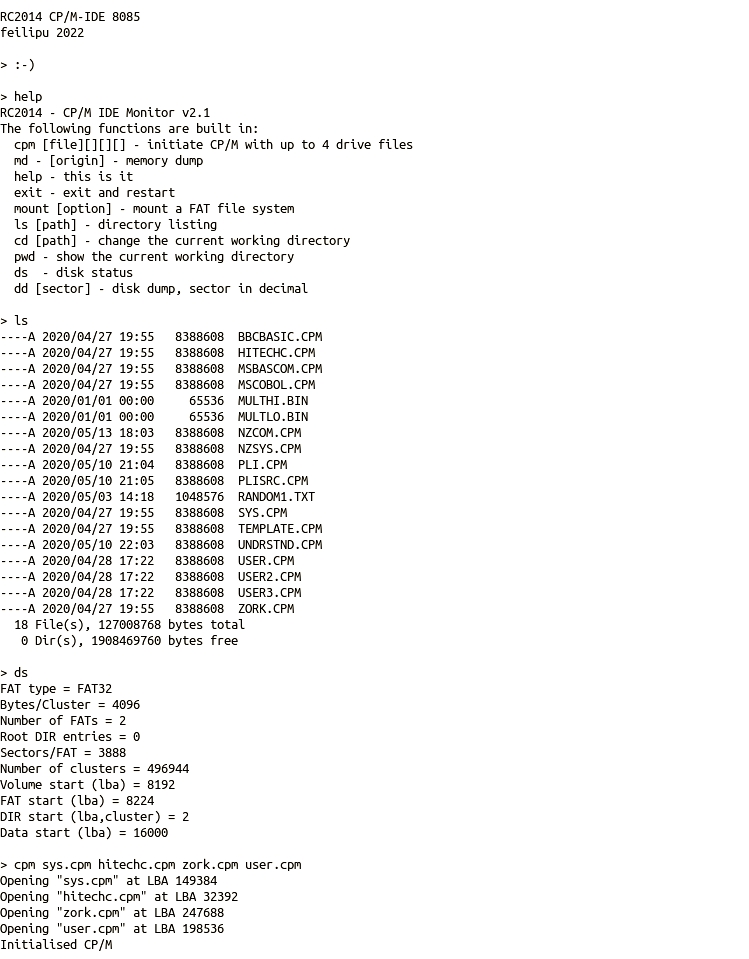
The CP/M-IDE system supports a maximum of 4 active drives of nominally 8 MByte each. The maximum possible size of any CP/M disk is 8 MByte, due to overflow of a 16-bit calculation within the BDOS. Further each CP/M disk can support up to 2048 files as a maximum. By setting the standard CP/M-IDE disk type to be maximised both in terms of size and number of supported files there is no question of the disk storage being too small. The only limitation introduced is that up to a maximum of 4 CP/M drives can be active at any one time, which leaves us with the maximum free TPA RAM.
The choice of 4 drives for CP/M-IDE was based on nominally having 1 drive for CP/M system utilities, 1 drive for application files, 1 drive for user data or source files, and 1 drive for temporary files. In practice I’ve found that working with 2 or 3 drives is the most common scenario, and often it makes sense to copy the few needed system utilities onto a working drive and work off that one drive.
CP/M-IDE is like having a 4 “floppy” drive machine (with 8MB floppy disks), and a library of up to thousands of floppy disks to choose from. Just insert the floppy disks you want to use when you want to use them. This interchangeable disk strategy is different to other RC2014 CP/M implementations that put everything into a maximum of 16 “hard” drives, at fixed LBA locations or slices, and leave them attached permanently.
It should be emphasised that a CP/M-IDE disk is purely a normal file from the perspective of an IDE FAT32 (or FAT16) formatted disk. It can be copied, moved, compressed (or zipped), or archived by any disk tools, in any modern O/S, as desired.
As CP/M-IDE uses LBA addressing there can be as many CP/M disks stored on the IDE FAT32 (or FAT16) formatted disk as desired, and CP/M-IDE can be started with any 4 of them in any drive. Note that CP/M does not know about or care about the FAT file system. On launch the CP/M-IDE BIOS is provided with an initialisation LBA for each of its 4 drives by the boot shell, and all future sector references to each disk (file) are calculated from these initial LBAs as provided for each drive.
As the FAT32 format supports over 65,000 files in the root directory, and a similar number of files in each sub-directory, collections of hundreds or even thousands of CP/M disk files can be stored in any number of sub-directories on the FAT32 parent disk. Knock yourself out by storing every conceivable CP/M application on thousands of disks on a single 120 GByte drive. As the CP/M Operating System doesn’t store state (the CCP/BDOS is reloaded each time an application terminates), changing or reordering drives is as simple as typing exit, and then restarting with the new drives desired using following shell command:cpm filefor.A filefor.B filefor.C filefor.D
CP/M Disks
As we can store literally thousands of CP/M disks on one FAT32 parent disk, let’s think about how to create CP/M disks, and how to store information on them. There are two main methods for building CP/M disks, being from within CP/M using native tools such as the yash shell, and alternatively from a Linux or Windows PC host with the physical FAT32 disk temporarily attached to the host. For creating, building, and organising many CP/M disks the second host based method will be faster and more convenient.
Building CP/M disks from a PC host relies on the use of the CP/M Tools software utilities package. cpmtools utilities can be used to copy executable CP/M files from your host PC, where you have downloaded them, into the CP/M disk found on your FAT32 disk.
As CP/M-IDE uses a “non-retro-standard” disk definition, cpmtools lacks the required definition in the standard distribution. The disk definition for 8MByte CP/M-IDE disks is provided below. In Linux based systems this disk definition should be appended to the host’s /etc/cpmtools/diskdefs file.
diskdef rc2014-8MB
  seclen 512
  tracks 64
  sectrk 256
  blocksize 4096
  maxdir 2048
  skew 0
  boottrk -
  os 2.2
end
On Windows PCs, as of cpmtools 2.20, creation of a new disk does not fully extend the resulting CP/M disk out to the full 8388608 Bytes of a properly sized CP/M disk. This means that as files are added to the CP/M disk it is possible that the host PC operating system may potentially fragment the disk as it grows it. This would be bad, as offsets are calculated from the initial file LBA and therefore the CP/M-IDE system has no way to recognise fragmented CP/M disk files. Therefore, for safety, a template CP/M disk file has been provided which can be stored onto the parent disk and then copied and renamed as often as desired.
Typical usage to check the status of a CP/M disk a.cpm, list the contents, and then copy a file (e.g. bbcbasic.com) from the host to the CP/M disk, is shown below.
> fsed.cpm -f rc2014-8MB a.cpm
> cpmls -f rc2014-8MB a.cpm
> cpmcp -f rc2014-8MB a.cpm ~/Desktop/CPM/bbcbasic.com 0:BBCBASIC.COM
CP/M System Disk
Building a CP/M System disk is a personal choice. There are multiple utilities and applications available, and not all of them will be relevant to your own needs. However, to get started, the contents of the RunCPM system disk can be used. An extended version can be found here.
Also, the NGS Microshell can be very useful, so it has been added to the example system disk too. There is no need to replace the default DRI CCP with Microshell. In fact, replacing it permanently would remove the special EXIT function, added to the CP/M-IDE version of the DRI CCP, used to return to the shell.
CP/M Application Disks
The CP/M Drives directory contains a number of CP/M disks containing commonly used applications, such as the Zork Series, BBC Basic, Hi-Tech C v3.09, and MS BASIC Compiler v5.3. The MS Basic (Interpreter) v5.29 for 8085/Z80 is available in the system drive.
Of these applications above, the Hi-Tech C v3.09 suite continues to be updated and maintained by Tony Nicholson. Therefore it is useful to update the HITECHC.CPM.zip CP/M disk with the current release files.
Of particular interest is the yash shell, which runs on CP/M and allows full access to the underlying FAT File System. It provides all of the standard file management tools which are missing (due to space constraints) from the CP/M-IDE ROM shell. This can be found in the z88dk-ext/os-related/CPM directory, together with the instructions to compile it. It is also provided in the CP/M-IDE “system disk”.
Common Usage
When commencing a new project it can be convenient to start with a new clean working drive. Either the yash shell can be used from within CP/M to create a new drive file. The yash shell will properly extend the created file to ensure that it is contiguous on creation. Or the physical drive can be temporarily attached to a PC and normal O/S file management can be used to copy the template drive file provided, and then rename the newly created drive file appropriately for the project.
Alternatively when working with a CP/M compiler, or editor, or other tool set, making a copy of the original distribution drive file and working from that copy (rather than the original) can be quite useful. As this allows original files in distribution sets to be preserved, and duplicated as needed.
Alternatively, on first boot into CP/M, mount the sys.cpm system drive and a new empty working drive. It can then also be useful to copy some CP/M commands onto the working drive using PIP.COM, then the sys.cpm system drive does not even need to be mounted on further boots. Generally XMODEM.COM is all that is necessary, to transfer binaries from a host computer, as the CP/M CCP has DIR, REN, ERA, TYPE, and EXIT commands built in.
Then, on each subsequent boot-up of CP/M only the working drive in drive A: is necessary. After compiling a new project with z88dk, the work-in-progress application .COM or .bin can be uploaded to the RC2014 using XMODEM.COM and then tested. If the work-in-progress crashes CP/M or needs further work, then repeat the process as needed without danger of trashing files in any other drives.
Of course other development workflows are possible, as is simply mounting the ZORK games drive and playing an adventure game or two.
Building CP/M Software from Source
CP/M-IDE is quite unusual in that it is built with a unix like shell as the system boot loader. From the shell the CP/M system is started, but it is also possible to use the shell to read the FAT file system and provide directory listings, to print memory and disk sector contents, and to provide status for the attached drive. Other versions of CP/M for Z180 have file system write capability included, but due to the limited capacity (32kB) of the RC2014 ROM these additional file management functions had to be omitted from the CP/M-IDE ROM, though they are available from the yash shell application.
z88dk
The chicken or the egg? In this case the z88dk is both the starting point CP/M-IDE and the finishing point for developing CP/M-IDE applications.
There is an installation guide for z88dk, as well as a how to for the RC2014 with z88dk. Both of these can be followed to get your z88dk installation working and ready to build the CP/M-IDE.
By default the z88dk ACIA drivers were set up to use a 15 Byte transmit buffer. This needs to be changed to a 31 Byte transmit buffer, by changing this configuration to 0x20.
Also, if you wish to enable the shadow RAM setting where the Memory Module or SC108 Module is used then this setting needs to be changed to 0x01. This will enable the RAM copy stub and shadow RAM write and read functions. This is not relevant for the 8085 CPU build (which doesn’t support relocatable jump instructions), and is disabled by default for the Z80 builds (to support the 64k RAM Module).
And finally, the ide driver is selected by using either CF IDE (8-bit) or PPIDE (16-bit) interfaces. To use the PPIDE interface the CF Module configuration needs to be set to 0x00 to disable it.
With these settings adjusted to suit the targeted hardware, the RC2014 libraries need to be rebuilt. Before rebuilding, be sure of whether shadow RAM should be enabled, and which IDE interface type should be enabled. The sure way to do this is by a full rebuild of z88dk, as both 8085 and Z80 libraries will be touched. it is done with the ./build.sh -c command from the root directory of z88dk. There are other alternatives, such as deleting the libraries that will have to be changed and executing the ./build.sh command.
z88dk-libraries
As well as two compilers, a macro assembler, and a large variety of useful tools, the z88dk is in essence a library of Z80 assembly language code covering all of the standard C requirements, and providing multiple options for implementing these libraries.
However, the z88dk doesn’t have C code libraries included. These are excluded because they can take too long to compile, and z88dk already takes quite a while to build as is. However the use of external libraries, and mainly C libraries is supported through the use of the z88dk-lib tool, which can import a compiled library and allow the linker to find it when a final binary application is being prepared.
For CP/M-IDE we need to have a high quality, reliable, fully functional FAT file system implementation. The most commonly used implementation is the ChaN FatFS. This code has been modified to work effectively with the Z80, and is provided in my z88dk-libraries.
For CP/M-IDE I have elected to use the SDCC compiler with the IY version of the libraries. For the CP/M-IDE 8085 the only option is to use the SCCZ80 compiler as it supports 8085 (and 8080) compilation.
As noted above, there is insufficient ROM available in the 32kB to support the full set of FAT file system functions, so we have to build a special version that is “read only”. There is a configuration that should be set to 1 to enable RC2014 read only in the file here. Then the library can be rebuilt with the following command lines.
> zcc +rc2014 -clib=new -m8085 -x -O2 --opt-code-speed=all -D__DISABLE_BUILTIN --math32 @ff.lst -o ../ff_85_ro
> zcc +rc2014 -clib=sdcc_iy -x -SO3 --opt-code-speed --max-allocs-per-node400000 @ff.lst -o ../ff_ro
This will produce two libraries. These library files need to be copied into the z88dk third party library directories manually. The z88dk-lib program will position the normal libraries correctly, and these special read only libraries can be simply placed beside the normal libraries in the z88dk file structure. To copy the normal libraries the command is here.
> z88dk-lib +rc2014 ffThe FAT file system libraries are now available for z88dk so we can move on to compiling CP/M-IDE
Building CP/M-IDE
The source code available in the RC2014 Github repository for CP/M-IDE is kept up to date. There are five versions, each tuned to suit their respective hardware characteristics. There is no “auto identification” of additional hardware. This implementation of the CP/M operating system supports only IDE attached FAT formatted disks and 1 or 2 serial ports, so that is all that is necessary. Any optional additional hardware available is supported by drivers built into the relevant application.
From the source directory of each version the command line identified here can be issued. The resulting .ihx file (renamed as .hex) can be compared with the provided HEX file. For interest it is worth compiling with the --list option, and studying the resultant assembly listings. This gives a good overview of the quality of code produced by the two compilers, and also the amount of space required to assemble the CP/M CCP/BDOS and BIOS components.
> zcc +rc2014 -subtype=acia85 -O2 --opt-code-speed=all -m -D__CLASSIC -DAMALLOC -l_DEVELOPMENT/lib/sccz80/lib/rc2014/ff_85_ro @cpm22.lst -o ../rc2014-8085-cpm22 -create-app
> zcc +rc2014 -subtype=acia -SO3 --opt-code-speed -m -llib/rc2014/ff_ro --max-allocs-per-node400000 @cpm22.lst -o ../rc2014-mini-cpm22 -create-app
> zcc +rc2014 -subtype=sio -SO3 --opt-code-speed -m -llib/rc2014/ff_ro --max-allocs-per-node400000 @cpm22.lst -o ../rc2014-sio-cpm22 -create-app
> zcc +rc2014 -subtype=sio -SO3 --opt-code-speed -m -llib/rc2014/ff_ro --max-allocs-per-node400000 @cpm22.lst -o ../rc2014-pro-cpm22 -create-app
Now we have a functioning CP/M-IDE Intel HEX file, which can be written to EEPROM and tested.
CP/M-IDE Applications
New applications can be built using either the zcc +rc2014 -subtype=cpm or zcc +cpm for Z80 targets, or for the CP/M-IDE 8085 use zcc +cpm -clib=8085 to build applications. There are example applications to test with in the z88dk examples directory including, for example, players for 8-bit sound.
How does it work?
This is a description of CP/M-IDE 8085 specifically. The versions for the Z80 are quite similar, and so this can also be used as a reference for their operation. However as the RC2014 8085 support is unique in z88dk it is worth noting the specifics here.
The CP/M-IDE 8085 build is based on the rc2014 target and acia85 subtype within z88dk. The 8085 CPU starts execution at address 0x0000 from /RESET, therefore the target must write an effective Page 0 including a jump to the start of code, and interrupt and trap vectors, before the main() program for the CP/M-IDE shell can be started. z88dk uses the m4 macro preprocessor tool to expand included assembly code, and the configuration files for the acia85 subtype are found in config_8085.m4.
The overall initialisation process for the acia85 subtype is found in CRT 2 startup code for the RC2014. Each target in z88dk has multiple subtypes, and each of these subtypes has its own CRT startup code specification. These startup specifications are fully expanded and can be read most efficiently by using the --list option when compiling the system.
Before diving into the startup process it is worth considering how and where drivers for the rc2014 acia85 build are obtained. As the acia85 subtype is hybrid across newlib and classic libraries within z88dk it is worth noting that most of the drivers for acia85 are obtained from the device and driver directories within the rc2014 target. However, stdio drivers for acia85 and basic85 subtypes are found in the classic library in the rc2014/stdio directory.
Further, using the characteristics of linker preferences, if we chose to override the library drivers with our own versions found within the CP/M-IDE BIOS then the library versions will be ignored. And that is the case, where we provide the ACIA, 82C55, and IDE drivers. This also means that before the main() function is started we need to copy these drivers to their correct location in RAM. This process is done by placing code in the code_crt_init section, as this code will be loaded and run prior to main() according to the memory model allocation.
Now we have our interrupt vectors completed, and the interrupt code placed with buffers initialised and ready to go. Our diskio and IDE drivers have been placed and now we can start our main shell user interface. Now we are parsing the command line using a shell system inspired by the example code by Stephen Brennan. Each of the commands implemented are self explanatory, and are mainly invoking one of the ChaN FAT file system functions. However the cpm command requires further description as this is the transition point from z88dk into DRI CP/M.
The cpm function is called with up to 4 arbitrary file names, representing the 4 CP/M disks. These file names are tested and, if all the files provided are found to exist, the base LBA of each file will be written to a specific location in cpm_dsk0_base[], and processing will be handed over to the cpm_boot() function.
The _cpm_boot function is the CP/M cold boot mechanism. The CP/M cold boot will firstly toggle-out the lower 32kB of ROM to reveal a “clean” 32kB of RAM. At this point the 8085 interrupt and trap vector addresses must be written into Page 0 RAM, together with other important CP/M locations such as the I/O byte. Then control is passed to the rboot function to continue with the cold boot.
In the cboot process we should remember that the contents of the CCP/BDOS and the BIOS RAM have already been written to upper 32kB of RAM by the preamble code, so this process does not need to be repeated. This is different in the warm boot wboot process where we have to assume that the CP/M application or transient program will have overwritten the CCP and possibly also the BDOS, so we have to repeat the initialisation found in the preamble called by pboot.
As part of the cboot and wboot process, we check which CP/M disk is going to be used for our A: drive, by reading the LBA base, and then launching CP/M CCP shell by returning to the to the preamble code and falling through to _main.
From here it is all standard CP/M, and the contents of the CP/M Users Manual apply.
