
I’m building a Z180 based development board called the YAZ180 for the 40th anniversary of the Z80 processor. As part of that process, I need to have a development environment that supports the Z80 and the Z180 processors. As I haven’t finished building the YAZ180 yet, I’ll be testing the development environment on the RC2014 platform in the interim.
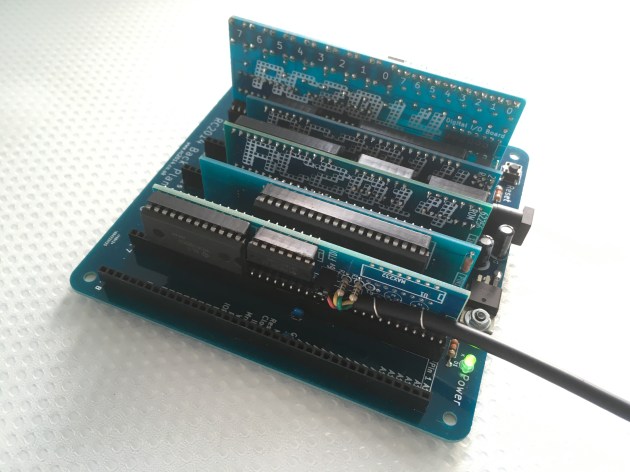
RC2014 Serial I/O & CPU
There are a couple of major differences in the workflow required to program the YAZ180 from the RC2014. The RC2014 requires an EEPROM programmer to burn the resulting HEX file into its ROM. Eventually, the YAZ180 will use a PERL program to manipulate a parallel port to programme FLASH memory. However, for the purposes of setting up a development environment they are essentially the same.
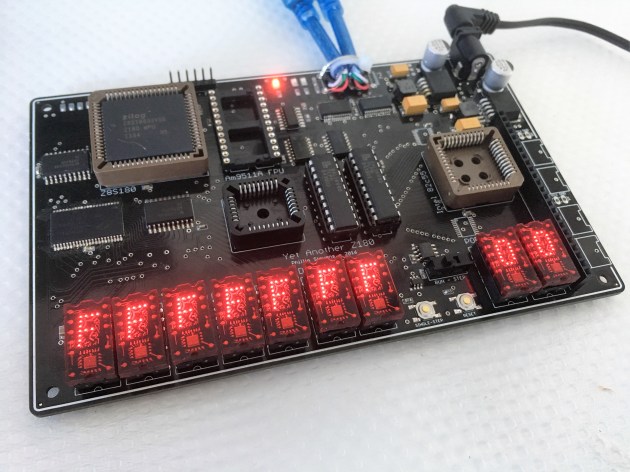
YAZ180 Prototype
To set up the required environment, we’ll need to have:
- A C compiler suite capable of generating HEX or BIN files for burning onto the hardware.
- Applicable .CRT files to initialise the CPU and RAM, either Z80 or Z180 specific, so that the C environment can be properly launch.
- Suitable library files for USART, and other interfaces, appropriate for the hardware in use.
- Configuration to allow the correct tools and libraries to be found from within the Eclipse IDE.
A C Compiler Suite
There are only a few options for C compilers for the Z80 processor. There is a the Zilog development environment, and the SASM Softools. On the open source side there are two options worth mentioning, being the Small Device C Compiler (SDCC) and the Z88DK Small C Compiler.
There are a few reviews on the Internet of the various options, but in summary the best outcome seems to be to use the Z88DK together with the SDCC Compiler, and the “new library”.
The Z88DK team contributed this information to the RC2014 forum, which gives an overview of the options.
There are two C compilers. One C compiler is sccz80 which is derived from small C but z88dk’s version has seen continuous development over the past 30 years so it’s had most of the limitations of small C removed. For example, floating point is supported, ANSI C declarations are supported, 8/16/32-bit integers are supported and so on. It is a little short of C89 compliance with a few notable non-compliances being multi-dimensional arrays and function pointer prototyping.
The other C compiler is a patch of sdcc, another open source compiler that attempts to implement subsets of C89, C99 and C11. sdcc is an optimizing compiler and z88dk’s patch improves on sdcc’s output by supplying some Z80 bugfixes not yet incorporated into sdcc itself and by supplying a very large set of peephole rules to further improve output.
You can choose which C compiler you use by selecting the appropriate switch on the command line. In your makefile you are using sccz80. To use sdcc, “-clib=sdcc_ix” or “-clib=sdcc_iy” would appear in the compile line.
And then there are two C libraries.
The classic C library is the C library that has always shipped with z88dk. It has many crts available for it that allows compiling for a lot of target machines out of the box. The level of library support varies by target with the best supported having sprite libraries, sound, graphics, etc supplementing the standard c library. It is mostly written in machine code and has a small stdio implementation. However, at this time it cannot be used to generate ROMable code as it mixes variables with code in the output binary. It’s also not compatible with sdcc at this time. Both of these issues are being addressed now.
The new C library is a rewrite from scratch with the intention of meeting a subset of C11 compliance. It is 100% machine code, is written to be compatible with any C compiler, and can generate ROMable code with separation of ROM and RAM data. The stdio model is object oriented and allows device drivers to be written using code inheritance from the library. Although it’s not finished (it’s missing disk io and non-blocking io), it is in an advanced state.
The choice of C library is made on the compile line. “-clib=new”, “-clib=sdcc_ix” and “-clib=sdcc_iy” all use the new C library. Anything else uses the classic C library. In order to generate ROMable code, you should really be using the new C library.
The sdcc_ix and sdcc_iy libraries are chosen when sdcc is the compiler and are selected between by either ”-clib=sdcc_ix” or ”-clib=sdcc_iy” on the compile line. The difference between the two is which index register the C library uses. “sdcc_ix” corresponds to the library using ix and “sdcc_iy” corresponds to the library using iy.
It’s always preferable to use the “sdcc_iy” version of the library because this gives sdcc sole use of ix for its frame pointer while the library uses iy. If “sdcc_ix” is selected, sdcc and the library must share ix which means the library must insert extra code to preserve the ix register when it is used. This means the “sdcc_iy” compile will be smaller.
z88dk’s C library is different from other compilers in that it is written in assembly language, so it is more compact and faster than other z80 C compilers.
Installation instructions for z88dk here and I’d recommend using a nightly build rather than the last release. z88dk is an active project and it changes quite quickly. If you run on windows or mac there are binary packages available from the nightly build. For linux or other targets there are instructions for building from source and for patching sdcc to create zsdcc, z88dk’s version of sdcc.
Just to add for the ROM target: the new C lib allows the stored data section to be lz77 compressed so this should save a few bytes in the stored binary in ROM. Another thing you could do is compile a program for RAM and store a compressed copy in ROM that gets decompressed into RAM at startup.
Z88DK & SDCC Installation
I’m installing Z88DK and SDCC onto Ubuntu 16.04 AMD64 and, since the machine has recently been refreshed, many packages that were required for the install were missing.
Clone the latest nightly checked Z88DK Github package:
git clone https://github.com/z88dk/z88dk.git sudo apt-get install expect texinfo libxml2-dev flex bison gputils libboost-devThis will create a populated z88dk directory in the current working directory.
To succeed in building the ‘z80svg’ graphics tool you need the ‘libxml2’ library to be previously installed, although its absence will not prevent the rest of the kit from building.
Then, just type:
cd z88dk git submodule update --init --recursive chmod 777 build.sh (just in case) ./build.shYou can run z88dk keeping it in the current location, all you need to do is to set the following environment variables.
Supposing you have bash (most likely it is your system default shell) and you want to keep z88dk in your home directory, you can configure it permanently in this way:
vi ~/.profileModify the configuration by adding these lines (with the appropriate paths).
export PATH=${PATH}:${HOME}/z88dk/bin export ZCCCFG=${HOME}/z88dk/lib/configA system install is not supported in this release of Z88DK.
Then to install the SDCC compiled specifically for the Z80 and Z180 these are the instructions.
Check out the current development version of sdcc. If you already have the sdcc-code tree available from a previous checkout you can instead perform an update.
svn checkout svn://svn.code.sf.net/p/sdcc/code/trunk@14210 sdcc-code # or if you're doing this to refresh your sdcc installation... cd sdcc-code svn update -r 14210You will have to apply the svn patch found in sdcc_z88dk_patch.zip and build sdcc from source. Copy “sdcc-z88dk.patch” from inside sdcc_z88dk_patch.zip into the sdcc-code directory.
The supplied configuration options disables all ports other than the Z80 family ports, and turns off compilation of many libraries. This will prevent errors from completing the build process, and results in a smaller binary.
cd sdcc-code/sdcc patch -p0 < ../sdcc-z88dk.patch cd sdcc ./configure --disable-ds390-port --disable-ds400-port --disable-hc08-port --disable-s08-port --disable-mcs51-port --disable-pic-port --disable-pic14-port --disable-pic16-port --disable-tlcs90-port --disable-xa51-port --disable-stm8-port --disable-pdk13-port --disable-pdk14-port --disable-pdk15-port --disable-pdk16-port --disable-mos6502-port --disable-mos65c02-port --disable-r2k-port --disable-non-free --disable-device-lib --disable-ucsim --disable-packihx --disable-sdcpp --disable-sdcdb --disable-sdbinutil --prefix=`pwd`/sdcc-install make allCopy the patched and compiled sdcc executable from the src directory to {z88dk}/bin and rename it “z88dk-zsdcc”.
cp src/sdcc {z88dk}/bin/z88dk-zsdccUndo the patch.
cd .. patch -Rp0 < ../sdcc-z88dk.patchYou can stop here and verify the install was successful below. Keeping the sdcc source tree in an unpatched state can allow you to update the zsdcc binary by repeating the steps above as sdcc itself is updated. Both z88dk and sdcc are active projects that see frequent updates.
To verify that sdcc is usable from z88dk, try compiling sudoku.c for the rc2014 target using sdcc:
zcc +rc2014 -subtype=rom -v -m -SO3 --max-allocs-per-node200000 --c-code-in-asm --list sudoku.c -o sudoku -create-appUsing the C compiler
Assuming we have a source code called test.c
#include main() { return(0); }We can compile it and produce binary CODE and DATA sections. The CODE and DATA sections need to be concatenated, and then assembled into an Intel HEX file by appmake.
zcc +rc2014 -subtype=rom -v -m -SO3 --max-allocs-per-node200000 --c-code-in-asm --list test.c -o test -create-appThe binary code can be checked by installing and then using a disassembler z80dasm
sudo apt install z80dasm z80dasm --address --labels --origin=0x0 test.binLoading the Code
Eventually the YAZ180 will have a hardware USB interface, and Perl based loading mechanism to load both RAM and Flash storage. But, since I broke the only extant hardware interface, getting this function working will have to wait.
In the interim, I have to load assembled machine code into the YAZ180 via a back door, being via the YAZ180 Nascom Basic which I also have running. The back door is opened because the Basic interpreter has the capability to 1. insert or POKE arbitrary bytes into RAM located at any address, and 2. via a Basic instruction USR(x) jump into any location in RAM and begin executing code.
Because of these POKE, PEEK, and USR(x) instructions we can load our own program in two different ways. Firstly, we can encode our program as a series of poke instructions, and then let the Basic interpreter load the program code byte by byte. Whilst this is a practical way of loading smaller programs, it is quite inefficient and also somewhat difficult to confirm that the program is loaded into RAM correctly. Also, this method cannot handle writing to Flash, as the POKE command is only designed for RAM.
The second method is to take a two step approach. Use the previous method of generating POKE instructions to insert a small Intel HEX format capable program, or HexLoadr, into the RAM, and then use the USR(x) instruction to launch the HexLoadr which also reads the serial port, and inserts the read HEX formatted bytes into RAM or Flash. The first advantage of this method is efficiency because the density of program bytes is substantially higher in Intel HEX than it is in POKE instructions. Also, because we can craft the HexLoadr with any functions we choose, we can also enable it to configure the Z180 MMU using the Intel HEX Extended Segment Address, and program the entire physical address space of the YAZ180, and we can deploy capability to write Flash memory making changes written then permanent.
HexLoadr
The goal of the HexLoadr program is to load your arbitrary program in Intel HEX format into an arbitrary location in the Z80 address space, and allow you to start the program from Nascom Basic.
There are are several stages to this process.
- The HexLoadr.asm loader program must be compiled into a binary format, HEXLOADR.BIN.
- HEXLOADR.BIN must then be converted to a series of POKE statements using the bin2bas.py python program.
- These POKE statements are then loaded through the serial interface into Nascom Basic to get the HexLoadr program placed correctly into the RAM of the RC2014 or YAZ180 machine.
- The starting adddress of the HexLoadr program must be inserted into the correct location for the USR(x) jump out of Nascom Basic.
- Then the HexLoadr program will initiate and look for your program’s Intel HEX formatted information on the serial interface.
- Once the final line of the HEX code is read, the HexLoadr will return to Nascom Basic.
- The newly loaded program starting address must be loaded into the USR(x) jump location.
- Start the new arbitrary program by entering USR(x).
Important Addresses
There are a number of important Z80 addresses or origins that need to be modified (managed) within the assembly and python programs.
Arbitrary Program Origin
Your program (the one that you’re doing all this for) needs to start in RAM located somewhere. Some recommendations can be given.
For the RC2014 with 32kB of RAM, and the YAZ180 with 56kB of RAM available, when Nascom Basic initiates it requests the “Memory Top?” figure. Setting this to 57343 (0xDFFF), or lower, will give you space from 0xE000 to 0xFFFF for your program and for the hexloader program.
The eXit option on my initiation routine for Nascom Basic is set to jump to 0xE000, Under the assumption that if you are jumping off at restart you are interested to have a large space for your arbitrary program.
For the YAZ180 with 56kB of RAM, the arbitrary program location is set to 0x2900, to allow this to be in the Common 0 Space for the MMU. Further for the YAZ180, the MMU Bank Space is configured from 0x4000 through to 0x7FFF so that the entire address space can be written by configuring the physical location at which the HexLoader operates.
HexLoadr supports the Extended Segment Address Record Type, and will store the MSB of the ESA in the Z180 BBR Register. The LSB of the ESA is silently abandoned. When HexLoadr terminates the BBR is returned to the original value.
HexLoadr Program Origin
For convenience, the HexLoadr program is configured to load itself from 0xFF00. This means your arbitrary program can use the space from 0xE000 to 0xFEFF without compromise. Further, if you want to use a separate stack or heap space (preserving Nascom Basic) the HexLoadr program space can be overwritten, by setting the stack pointer to 0x0000 (which decrements on use to 0xFFFF).
This can be changed if substantial code or new capabilities are added to the HexLoadr program
RST locations
For convenience, because we can’t easily change ROM code interrupt routines already present in the RC2014 or YAZ180, the serial Tx and Rx routines are reachable by calling RST instructions.
* Tx: RST 08H expects a byte in the a register.
* Rx: RST 10H returns a byte in the a register, and will loop until it has a byte to return.
* Rx Check: RST 18H will return the number of bytes in the Rx buffer (0 if buffer empty) in the a register.
Program Usage
- Select the preferred origin .ORG for your arbitrary program, and assemble a HEX file using your preferred assembler.
- Confirm your preferred origin of the HexLoadr program, and adjust it to match in the hexloadr.asm and bin2bas.py programs.
- Assemble hexloadr.asm using TASM to produce a HEXLOADR.BIN file using this command line.
c:> tasm -80 -x3 -a7 -c -l -g3 d:hexloadr.asm d:hexloadr.bin
- Produce the “POKE” file called hexloadr.bas by using the python command.
$ python bin2bas.py HEXLOADR.BIN > hexloadr.bas
- Start your RC2014 or YAZ180 with the Memory top? set to 57343 (0xDFFF) or lower. This leaves space for your program and for the HexLoadr program.
- Using a serial terminal (assuming your machine is located at device /dev/ttyUSB0) either copy and paste all of the POKE commands into the RC2014, or upload them using a slow (or timed) serial loading program. If desired the python slowprint.py program can be used for this purpose.
$ python slowprint.py /dev/ttyUSB0
- From the ok prompt in Basic, start the HexLoadr program with PRINT USR(x).
- Using a serial terminal, upload the HEX file for your arbitrary program that you prepared in Step 1. If desired the python slowprint.py program can also be used for this purpose.
$ python slowprint.py /dev/ttyUSB0
- Using POKE commands relocate the address for the USR(x) command to point to .ORG of your arbitrary program.
- When HexLoadr has finished, and you are back at the Basic ok prompt start your arbitrary program using PRINT USR(x), or other variant if you have parameters to pass to your program.
Credits
HexLoadr is derived from the work of @fbergama and @foxweb.
