
ReGIS graphics can be used to build high quality vector graphical output for embedded (Serial) devices, for example Arduino devices or retro-computers such as the RC2014 running CP/M, with the graphics output being displayed on a Windows 10 desktop. This method uses WSL Ubuntu with XTerm to support graphical output for Serial connected embedded devices, and a Windows based X Server to host the display.
Background
From the Wikipedia, ReGIS, short for Remote Graphic Instruction Set, is a vector graphics markup language developed by Digital Equipment Corporation (DEC) for later models of their famous VT series of computer terminals. ReGIS supports vector graphics consisting of lines, circular arcs, and similar shapes. VT series terminals supporting ReGIS generally allow graphics and text to be mixed on-screen, which makes construction of graphs and charts relatively easy.
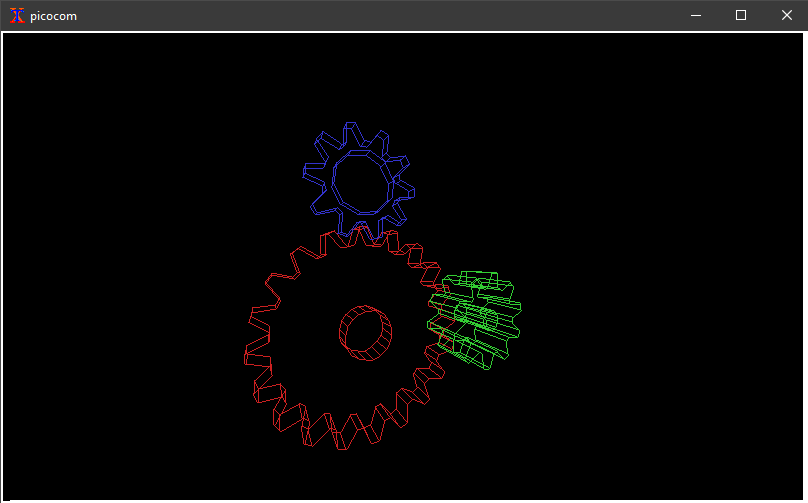
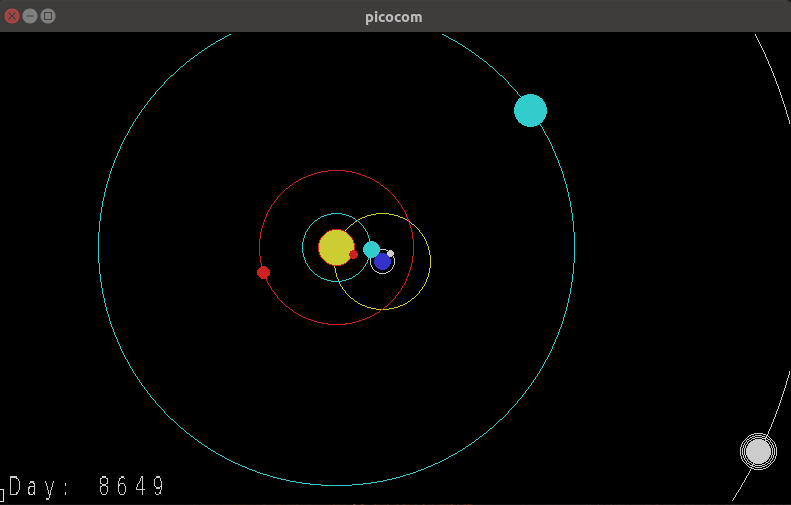
ReGIS is useful to display information that can be more easily interpreted as a diagram or a graph, such as plotting planet motion. It can also be used for vector graphics such as the GLX Gears program.
Today, where DEC VT series terminals are impractical to obtain, the easiest method to display ReGIS vector graphics is to use the XTerm terminal emulator. The XTerm fully supports ReGIS, but this capability is not enabled in general release versions. We’ll need to compile our own version with ReGIS enabled.
XTerm was developed for the X Windows System running on versions of Unix or Linux. So to use it on a Linux desktop machine running (e.g. Ubuntu) is quite straightforward. But if we want to use it on a Windows 10 desktop we will need to jump through some additional hoops and that is the point of this story.
The X window system (X) is a client / server windowing system developed in the mid 1980’s to support remote windowing. Unlike most earlier display protocols, X was specifically designed to be used over network connections rather than on an integral or attached display device. X features network transparency, which means an X client program running on a computer somewhere on a network can display its user interface (window) on an X Server running on some other computer on the network. The X Server is typically the provider of graphics resources and keyboard/mouse events to X clients, meaning that the X Server is usually running on the computer in front of a human user, while the X client applications run anywhere on the network and communicate with the user’s computer to request the rendering of graphics content and receive events from input devices including keyboards and mice.
To get XTerm to connect to a Serial interface, provided by an Arduino device or by a retro-computer such as a RC2014 CP/M machine, it is necessary to use a dumb terminal emulator to pipe the Serial bit-stream originating on the Serial-USB (FTDI) interface connection to XTerm without tampering with the non-displayable ESC code sequences that ReGIS uses for signalling. The best option is to use picocom for this role. Most other terminals “cook” the Serial to remove those ascii control characters that can’t be displayed, rather than passing them transparently.
We now have a complete solution to display ReGIS graphics originated on an Arduino or RC2014 on Unix / Linux machines. XTerm, configured with ReGIS enabled, together with picocom to pipe the Serial bit-stream is all that is required to display vector graphics on a Linux desktop.
To use Windows 10 as the desktop we will need to host a Unix / Linux machine running XTerm and picocom somewhere connected to the embedded device, and provide an X Server on the Windows 10 machine to display the window generated by XTerm. This can be done with a completely separate Linux machine, such as a Raspberry Pi or similar, but it is more convenient to do it using a Virtual Machine inside the Windows 10 platform provided by Windows Subsystem for Linux.
Microsoft provides two versions of the WSL. The first version WSL1 uses specific services and drivers to give Linux applications access to the Windows 10 kernel and file system. WSL1 supports access to Serial interfaces and the host file system. The use of the specific services and drivers between the Windows 10 kernel and Linux causes a performance penalty for most Linux applications, so WSL2 was introduced with a lightweight virtual machine, based on Hyper-V, to optimise Linux application performance. However WSL2 does not allow access to Serial interfaces or direct access to the Windows 10 file system. For most applications WSL2 is a better choice, but as we need to access the Serial interfaces directly we need to use WSL1.
With WSL1 installed, we can create an Ubuntu 22.04 LTS based Linux system to install and host our XTerm and picocom applications. And, optionally, we can build z88dk following these instructions, and install z88dk-libraries supporting ReGIS providing a C interface for RC2014 CP/M applications.
From our Windows 10 desktop machine we need to provide an X Server to enable XTerm to display its window on our desktop. There are several options available to do this. Xming (not free) and VcXsrv (open source) are two that are commonly recommended.
Another option to provide a Windows 10 X Server is MobaXterm. MobaXterm is proprietary, but is available for free for home users. It provides both an X Server (based on X.org) and secure shell (SSH) capability. SSH is particularly required where we need to connect to XTerm and picocom (the X client) running on separate Raspberry Pi hardware, but it is also useful for Windows 10 WSL. However, we can access WSL Ubuntu directly through its own terminal to initialize the XTerminal session, so for WSL Ubuntu the SSH capability is just a very convenient “nice-to-have”.
Implementation
Lets go through the steps required to get this all working…
Windows Subsystem for Linux & Ubuntu
The Windows Subsystem for Linux (WSL) allows Linux / Unix distributions to use the Windows host computer. This instruction is based on Ubuntu 22.04 LTS, but other distributions will be similar.
There is a longstanding bug in connecting USB to Serial interfaces to the WSL2 system, so it is best to use the WSL1 as a platform for development. Install WSL1 following the standard Microsoft instructions.
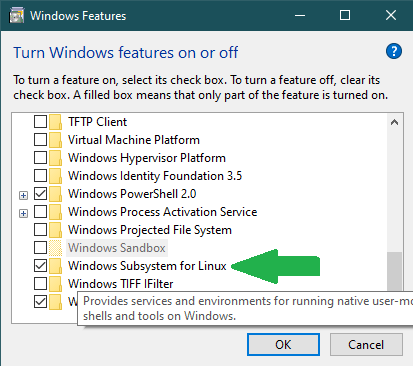
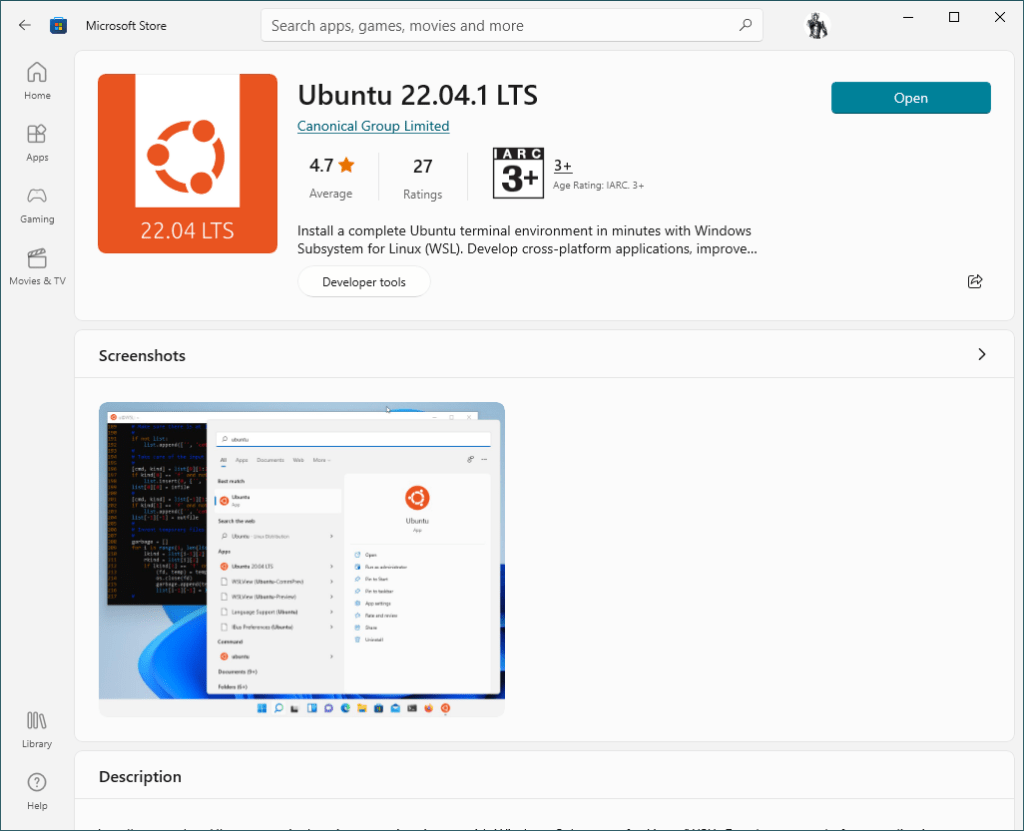
Once WSL is installed then go to the Microsoft store and install Ubuntu 22.04 LTS. There are options for both Windows 10 and Windows 11, so choose the suitable alternative.
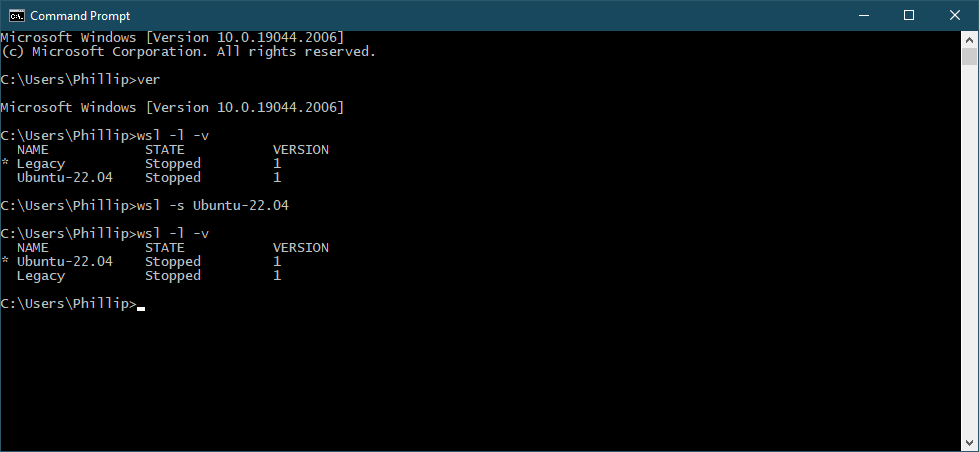
Confirm that you have both WSL1 and Ubuntu 22.04 LTS installed using. > wsl -l -v
And then set the default distribution to Ubuntu-22.04. > wsl -s Ubuntu-22.04
Then launch the Ubuntu 22.04 LTS subsystem using the Windows Start menu command, to configure the new distribution. Update and upgrade the packages using apt, and make any other adjustments you need. Set up directories that you will use to build XTerm and (optionally) build z88dk. Building z88dk will ensure that you have the prerequisites to prepare .COM files for later uploading to your RC2014 CP/M.
At this stage DO NOT install XTerm or picocom from the Ubuntu repositories.
Install MobaXterm for Windows 10
From the MobaTek webside download the installer version of MobaXterm for home use. Note if you are a corporate or business, please pay for a great product.
Launch the installer. It will automatically recognise your installed WSL and Ubuntu 22.04 LTS instances and will automatically configure SSH (local) terminal access for them. It will also allow you to connect directly to your Serial attached Arduino or RC2014 retro-computer if you configure a serial connection.
Use MobaXterm to connect to your Ubuntu 22.04 installation. The advantage of doing this is that the DISPLAY environment variable is automatically set, so that later XTerm can find the Windows 10 screen with no further setting needed. However, the direct Ubuntu 22.04 terminal can alternatively be used later for other purposes with no problem.
Preparing XTerm to support ReGIS
XTerm is the only known software solution supporting ReGIS. But it doesn’t support ReGIS in the default build. You’ll need to enable ReGIS support yourself by building and installing a customised version.
From your WSL Ubuntu command line use the below recipe. If you have not built any prior code on your WSL Ubuntu installation you may need to add additional packages, as signalled by the configuration step. Use apt to install them as needed.
> sudo apt install -y build-essential libxaw7-dev libncurses-dev libxft-dev
> wget https://invisible-island.net/datafiles/release/xterm.tar.gz
> tar xf xterm.tar.gz
> cd xterm-373
> ./configure --enable-regis-graphics
> make
> sudo make install
Install picocom for Ubuntu 18.04 LTS
From Release Version 3.0 picocom implemented advanced terminal control system calls, which are unsupported by the Windows 10 WSL1 implementation. This means that the Ubuntu 22.04 LTS supported release for picocom can’t be used with WSL1.
To work around this problem the Ubuntu 18.04 LTS Release Version 2.2 of picocom for amd64 can be installed. From your Ubuntu terminal, download the picocom 2.2-2 package and install it using dpkg.
Once it is installed, it is also useful to install the lrzsz package which provides XMODEM capability for picocom and other terminals.
It is also useful to hold the picocom package to ensure that it is not automatically upgraded to a later (unusable for our purpose) version. That is done with apt-mark.
> wget http://launchpadlibrarian.net/324629316/picocom_2.2-2_amd64.deb
> sudo dpkg -i picocom_2.2-2_amd64.deb
> sudo apt install lrzsz
> sudo apt-mark hold picocom
Using ReGIS
To initialise XTerm for VT340 emulation, connecting to Windows 10 Serial device COMx, from the MobaXterm terminal use this command string. This command assumes we’re using 115200 baud 8n2 with RTS flow control, and we’re going to use XMODEM protocol to send binaries to our RC2014 or other device. Check the picocom manual to adjust the serial interface configuration to your own needs.
> xterm +u8 -geometry 132x50 -ti 340 -tn 340 -e picocom -b 115200 -p 2 -f h /dev/ttySx --send-cmd "sx -vv"Alternatively to use XTerm for VT125 emulation use this command string.
> xterm +u8 -geometry 132x50 -ti 125 -tn 125 -e picocom -b 115200 -p 2 -f h /dev/ttySx --send-cmd "sx -vv"At this point a new XTerm window should appear on the Windows 10 desktop, supported by the MobaXterm X Server.
Assuming that you have a program which can generate ReGIS graphics already installed on your RC2014 (or Arduino), such as the demo program provided here, then it is time to start the program from the CP/M command prompt. Otherwise, it makes sense to use XTerm (with picocom) to access your RC2014 and upload the provided ReGIS demo program, or other any other program, using XMODEM protocol and the XM.COM or XMODEM.COM program on your CP/M installation, and then launch the program from the CP/M command prompt.
The resulting XTerm window (example image shown is planet-motion) should look similar to the image below.

And that is then all that needs to be done to enjoy high resolution vector graphics generated by a Serial connected embedded device such as an RC2014 running CP/M or an Arduino device.
The ReGIS library for z88dk has been developed to support ReGIS on the RC2014 and other Z80 CP/M machines. Therefore programs can easily generate the required Serial codes using the C functions provided.
The ReGIS library for Arduino is hardware agnostic, and supports all Arduino architectures. It can be installed from the Arduino Library Manager.
