
A few years ago, I was into fixed gear bicycles. I still am, but the kilometres I travel has dropped to zero. Cycling in Australia is too dangerous; it must be, because I have to wear a helmet even when I’m not racing.
Though my stories have been up for over 10 years at the Fixed Gear Gallery, I’m replicating them here in case of the unforeseen. Wouldn’t be the first time that the Internet has forgotten.
First build 2003(4)
Thanks for the great pictures and site. Inspired by what I’ve seen, I decided to fixx myself one too. My Giant CFR started life in ’95 with a 105 groupset. These aluminium lugged straight gauge carbon tube frames were pretty hot at the time as the Australian Institute of Sport used them for their training bikes (so the story went anyway). I added the Spinergy’s for the PBP in 1999.

The next morph was in 2001 when most of the 105 group was swapped for DA/Ultegra, and the standard (heavy aero) carbon fork was swapped for the Profile AC. Easton supplied the post and the bars. The Easton bars are great; very springy and gentle on the hands. What’s trick about the fixxer conversion? Choosing 43×16 means that the chainstays only had to be filed by about 0.5mm. The Surly Fixxer matches nicely with the Spinergy hub, but there is a little box cutter carving of extra metal on both parts necessary.
Getting both brake levers to pull the front calliper meant converting a giro upper cable housing by drilling it out enough to pass both cable inners, and putting a star washer under the clamp stops them slipping.

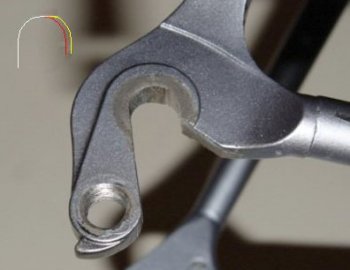
Fixxing Vertical Drop-Outs
Building a fixed gear bike out of my Giant CFR took a lot of thinking. Mostly, thinking about a new custom steel frame with everything perfect, Campy horizontal drop-outs, clearances, multiple braze-ons for long distance riding, etc. After about 6 months of almost constant thought about the perfect frame whilst riding around on my Giant CFR “fixed” in 39×15 (testing my perceived perfect gear of 42×16) I realised that I was potentially already riding my fixed gear bike. All I had to do was to convert the CFR and check whether this fixed gear riding is all that its cracked up to be…
*** Step 1, get rid of the rear brake calliper.
I never used it anyway. After a major high-side rear skid crash in ’01, on the way to hospital (my first helicopter flight) I resolved not to use it ever again. But, I didn’t want to cut up my left lever; I need it as I climb on the drops all the time. Also, I want to indicate when I make a centre of road turn, whilst braking. Solution: make both levers activate one calliper. Read on to see how this is done.
*** Step 2, which wheels?
Well I’ve had these Spinergy wheels for years. They are built with no dish and are about the stiffest and most aerodynamic things around. Build quality… hmmm. Let’s not speak about that. After finding the Surly Fixxer conversion on their web site, I thought use what you have… it’ll be the cheapest. But a UK Surly dealer thought that the Fixxer wouldn’t fit Spinergy, and in principal they are right.

Surly Fixxer and Spinergy both use the Shimano freehub spline system, but they both have a slight twist on this “standard”. Both Surly and Spinergy put much more metal (taller fatter splines) into their sides of the interface than Shimano. The result is that although Fixxer fits Shimano hub body fits Spinergy free hub fits Spinergy hub body fits Shimano free hub, the final Fixxer fixed hub and Spinergy hub body interface doesn’t work.
How to fix this? Using a box cutter, scrape and shape the splines on both Fixxer and Spinergy hob body so they are narrower and not so tall. Took me about an hour, as I was careful and feeling my way. It could be done faster if you know how much metal to remove in advance.
Surly provides right bearing, axle and any number of spacers with the Fixxer. For the Spinergy hub I needed to retain the existing QR axle. The hub left bearing is a cartridge type that matches a step in the axle to generate tension for the standard right cup and cone bearing in the freehub. With the fixxer, just use their spacer nut which provides the bearing surface for their right side cartridge bearing. To space for 130mm dropouts I used one of their #2 spacers. The end result is great. The chainline is 41mm from the inside of the thread. I used a DA cog with the shoulder in, which results in a 47mm chain line. Perfectly lined up with the outside of my double DA chain ring. I wish I’d known this before I set it up. I lost a lot of sleepless nights worrying about chainline… perhaps I worry to much.
*** Step 3. What gear?
That’s a question that can be answered simply. Every Australian cyclist knows that (Sir) Oppy won the ’31 PBP using a 69″ fixed gear. So, if I was going to ride the PBP fixed in 2007 then it had to be 69″ too. So that made it simple… 42×16 it was. (Looking back, I rode several 600km brevets and one 1,000km brevet on my Cannondale with 44×16 in preparation, but in the end didn’t take part in the wet PBP 2007).
*** Step 4. Chain length?
I used both James Quinlan’s ssConvert, and FixMeUp! to work out that if I use 42×16 then COINCIDENTALLY, my chain should be tight. Well it didn’t work out quite right, because of the difficulty of measuring the chainstay length accurately. When I tried the 42 chainring that I ordered, the chain drooped like a laundry line hung with wet washing. A quick test of 42×17 showed me that 43×16 should be my magic number. When the 43 chainring arrived, things were a little tighter I’d hoped, especially when I put on a new 8-speed chain (SRAM PC48). But, with chain tension a very little is often enough. I could see that only fractions of a mm separated me from success. 30min of filing, and testing every 20 or 30 strokes on each dropout, saw it fitting well.

I was careful to remove the same amount of metal from both sides, so that the wheel would still fit straight. 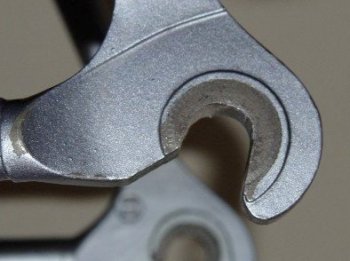
In the worst case, it’ll be difficult to take up tension as the chain wears. But if I keep using inexpensive chains then I won’t mind regular replacement of this part. Alternatively, I might find that I can keep the axle in the new “back” of the dropout (only 0.5mm back) with my QR tight, and this will fix the tensioning issue. I’ve no experience. We’ll see as things get on.
The Two Lever / One Brake Calliper Fix
Note YMMV. It works for me, it may not work for you. Particularly note: both Sheldon “nervous” Brown and Andrew “chary” Muzi don’t like the idea of having two inners going to one clamping bolt. If you have a problem with that, forget this fix. The issue is that if one cable slips, then the other will be loosened in the clamp and will probably slip too. You’ve been warned!
It is also possible to use a “London mod” which does a similar thing to my mod. The London mod puts a bolt in the calliper upper arm, and passes two cables AROUND the arm. I don’t like that solution because it creates a triangle of tension forces which strains (twists) the brake calliper unnecessarily, and doesn’t fix the two cable under one bolt issue.

First, at your local bmx store, find a SST ORYG Giro Upper Cable as the basis (but it would work with the Odyssey giro upper cable too).
The right piece is a “giro upper cable”. Differentiating it from the lower cable is a barrel adjustment to allow fine tension adjustment on the brake lever on the single cable end. This barrel adjustment bolt is the same diameter and threading as that on the upper arm of the brake calliper.
Cut off all the cables on the giro upper cable. Crack open the hard plastic doubler; its two halves are only pressed together. Remove the blob of cast metal containing the cable remnants.
Drill out the hollow barrel adjustment bolt using successively larger diameter drills until two brake cable inners run freely through it. I think it was 3.5mm from memory. Because there’s already a hole through the centre, its really easy to keep the drill straight. Then using a large drill, 6mm from memory, drill into the head of the bolt to remove the head. All that is left is a hollow screw.
Screw this hollow screw back into the plastic doubler thread till it stops. I put the ugly drilled end in first. Remove the fine adjustment from the brake calliper arm, and screw the end of the doubler into the calliper.
Cut the outer cables from both levers to fit. Feed both inners through the doubler and press the two halves together again. I’ve pulled the two inner cables under the same side of the calliper retaining bolt.
IMPORTANT: Put a star washer (not a flat washer) on first under the cable inners. This will increase the bite on the cables, and prevents them from slipping. Do up the retaining clamp bolt tightly.
VERY IMPORTANT: Test this fix properly. Squeeze one lever harder than you’ll ever need. Then the other. Then both at once. Check that nothing’s slipping. Test this to fix to death. If you don’t test and something is not right, then yours may follow.
Cannondale Track 2005
After nearly two years on my Giant CFR #632 it was finally time to buy a “real” fixed frame. I saw this Cannondale Track bike in a store window in my home town, and just had to get it, even though it’d been waiting for over two years to find an owner. The store manager was pretty happy to get it out of the shop…
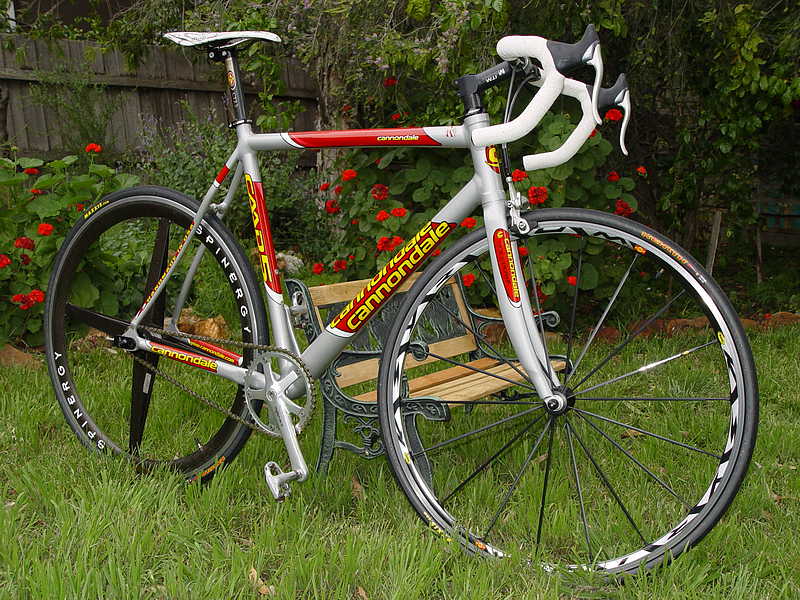
Converting it from standard trim to my comfortable suit of gear (off #632) and dual brake lever system went problem free, but again the Spinergy/SurlyFixxer hub took some work. The Spinergy has a 130mm axle, but the frame required 120mm.
So using a hand drill as a lathe, I carefully cut exactly 5mm from the left axle end, and then removed about 4-5mm from the right threaded end. When re-inserting the left axle stop I found that it needed to be shortened by a few mm (nearly to the rubber O-ring seal) to allow it to seat properly into the shortened axle.
The 5mm axle spacer previously used on #632 is also now unnecessary.

The hollow axle requires a quick-release but they’re not available in 120mm, nor are they strong enough to hold the wheel back/straight. Both issues are overcome by using a BMX chain tensioner. Co-incidentally, the chain tensioner has a guide which locks against the front of the axle, so no shear force is carried by the quick release skewer… lucky break.
The drive train is 1/8″ and I’m currently using 44-16 on 165mm cranks. I’d found I needed to lengthen the gearing, and go with shorter cranks to keep up with others in the peloton.
